Install optzi! on a Webflow Website
Add optzi! to Webflow’s site-wide Head code, publish the full site, and add a Privacy Choices footer link.
Last updated About 1 month ago
Overview
Add the main optzi! installation code in Webflow's site-wide Head code area, publish the full site, and add a separate, visible Privacy Choices link to the footer. Opening Privacy Choices does not accept, reject, or change consent. A visitor's choices change only when they save a choice in the optzi! panel.
Before you begin
- Publish your optzi! configuration. In the optzi! dashboard, make sure the site shows Published, not Not published or changes waiting to be published.
- In the optzi! dashboard, open your site and find Install on your site. Copy the complete installation code shown there.
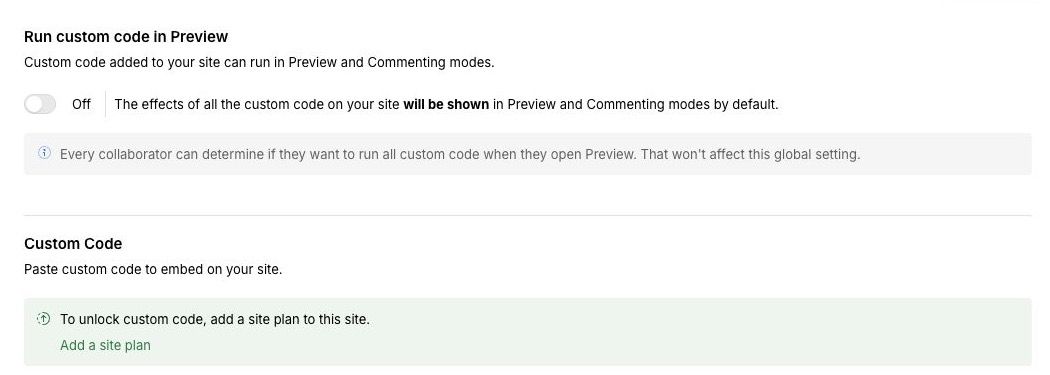
- Site-wide custom code requires eligible Webflow account access. For many site owners, this means an active paid Site plan; eligible paid Workspace plans can also provide access.
- Confirm that you have permission to edit custom code and publish the site.
- Keep the main installation code and the visible footer link as two separate items.
Add the main optzi! installation code
- Open the Webflow site's Site settings.
- Select Custom code in the Site settings navigation.
- In the site-wide Head code section, paste the complete code from Install on your site in the optzi! dashboard.
- Select Save changes.
- Select Publish.
- Select the public domain you want to update.
- Select Publish to selected domains.
Use the site-wide Head code section, not a page-only code box and not an Embed element on one page. Do not add async or defer or otherwise edit the code copied from optzi!.
If Webflow shows To unlock custom code, add a site plan to this site, stop and add an eligible Site plan before continuing. The Head code field is not available on that site yet.
Add the Privacy Choices footer link
- Open the site in Webflow's Designer.
- Select the footer text or link that should say Privacy Choices. If needed, add a normal Text Link to the footer.
- Open Element settings (the gear icon).
- Under Link settings, choose URL.
- Set the URL to exactly:
#optzi-privacy-choices - Leave Open in new tab off.
- Publish the full site again to the public domain.
This must be a normal link. Do not add inline JavaScript or a link that calls window.__optzi__.
Update an existing installation
- In the optzi! dashboard, open your site and find Install on your site.
- Copy the latest complete installation code.
- Open Site settings → Custom code.
- In Head code, replace the entire old optzi! installation with the new code. Do not edit or combine individual pieces.
- Check page-level custom code and Embed elements for duplicate optzi! installations. Keep exactly one site-wide current installation.
- Select Save changes.
- Publish the full site again. Changes to site-wide custom code require a new full-site publish.
How to test your installation
Code visible in Designer or Preview is not proof that it is running on the public website.
- Open the public published domain in a new private or incognito window.
- Confirm the optzi! banner appears for a new visitor.
- Test the homepage and representative standard, CMS, contact, and purchase pages.
- Use the banner to save a choice, then reload or visit another page.
- Confirm the small returning-visitor launcher appears and reopens the preferences panel.
- Select the visible Privacy Choices footer link. Confirm the panel opens and that opening it alone does not change the saved choice.
- Test essential purchase, booking, contact, and form-submit controls.
- If you use a
webflow.iostaging domain, it can be tested only after it is published and publicly available. An unpublished or unavailable staging site is not a real installation test.
Troubleshooting
The banner appears twice
Search the site-wide Head code, Footer code, page-level custom code, and Embed elements for useoptzi or optzi. Keep exactly one current site-wide installation. Do not remove unrelated custom code.
The banner does not appear
- Confirm the optzi! configuration is published.
- Confirm the code is in Site settings → Custom code → Head code.
- Confirm Save changes was selected.
- Run a full-site publish to the domain you are testing. A single-page publish does not include site-wide custom-code changes.
- Test the public domain in a new private window, not only Designer or Preview.
- If an older page is cached, hard refresh and try again after a few minutes.
The Privacy Choices link is missing or old
Confirm the footer change is present in the relevant page or shared component, then publish the site again to the domain you are testing.
The Privacy Choices link does nothing
Confirm its URL is exactly #optzi-privacy-choices, Open in new tab is off, and the current main optzi! installation is running on that page.
The change appears on webflow.io but not the custom domain
Publish again and select the custom domain in the publish dialog. Webflow lets you choose which domains receive a publish.
An old version still appears
Replace the complete old installation, save, perform a full-site publish, hard refresh, and test in a new private window. Do not edit individual pieces of the code.
When to contact optzi! support
Contact optzi! support if one current installation is saved and fully published but the banner or Privacy Choices panel still does not work on the public domain. Include:
- the public domain and affected page addresses;
- whether the issue affects the custom domain,
webflow.iodomain, or both; - what you expected and what happened; and
- screenshots with private information hidden.
Never send passwords, secret keys, or private account information.