Install optzi! on a Shopify Store
Add optzi! to your published Shopify theme, create a Privacy Choices footer link, and test essential storefront controls.
Last updated About 1 month ago
Overview
Add the main optzi! installation code to the theme.liquid layout of your published Shopify theme. Then add a separate, visible Privacy Choices item to the footer menu. Opening Privacy Choices does not accept, reject, or change consent. A visitor's choices change only when they save a choice in the optzi! panel.
Before you begin
- Publish your optzi! configuration. In the optzi! dashboard, make sure the site shows Published, not Not published or changes waiting to be published.
- In the optzi! dashboard, open your site and find Install on your site. Copy the complete installation code shown there.
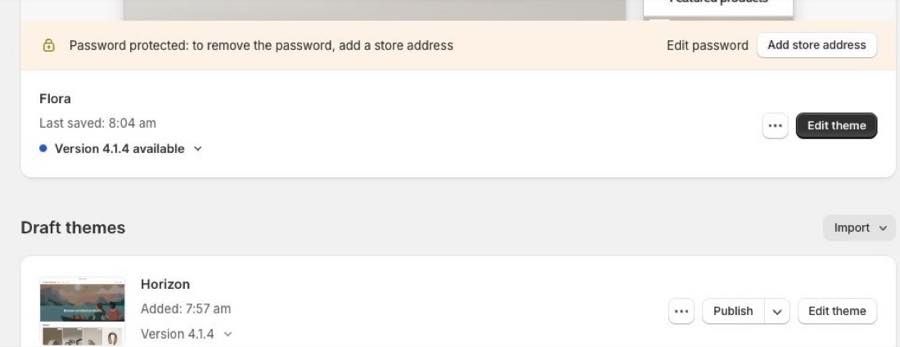
- In Shopify, identify the live theme shown above Draft themes. Some Shopify accounts label it Current theme. Code added to a draft theme does not affect the live storefront.
- Shopify recommends duplicating a theme before editing its code. Use the theme's … menu and choose Duplicate if you want a backup.
- Keep the main installation code and the visible footer link as two separate items.
Add the main optzi! installation code
- From Shopify admin, go to Online Store → Themes.
- Find the live theme shown above Draft themes.
- Open its … menu and select Edit code.
- In the file list, open layout, then open theme.liquid.
- Find the opening
<head>line near the top of the file. - On a new line immediately after
<head>, paste the complete code from Install on your site in the optzi! dashboard. - Select Save.
- Open the public storefront and complete the testing checklist below.
Do not edit Shopify's content_for_header line or remove or rewrite unrelated Shopify, theme, or app scripts.
Add the Privacy Choices footer link
- From Shopify admin, go to Content → Menus.
- Open the menu used by your theme's footer. It is often named Footer menu.
- Select Add menu item.
- In Label, enter Privacy Choices (or the wording your legal adviser has approved).
- In Link, enter the complete public storefront address followed by
/#optzi-privacy-choices. For example:https://your-store.example/#optzi-privacy-choiceshttps://your-store.example/with the homepage address customers actually use. - Select the matching URL suggestion from Shopify's dropdown. The menu's Save button should become available.
- Select Save or Save menu.
- In Online Store → Themes, select Customize for the current theme. Open the Footer section and confirm it uses the menu you edited.
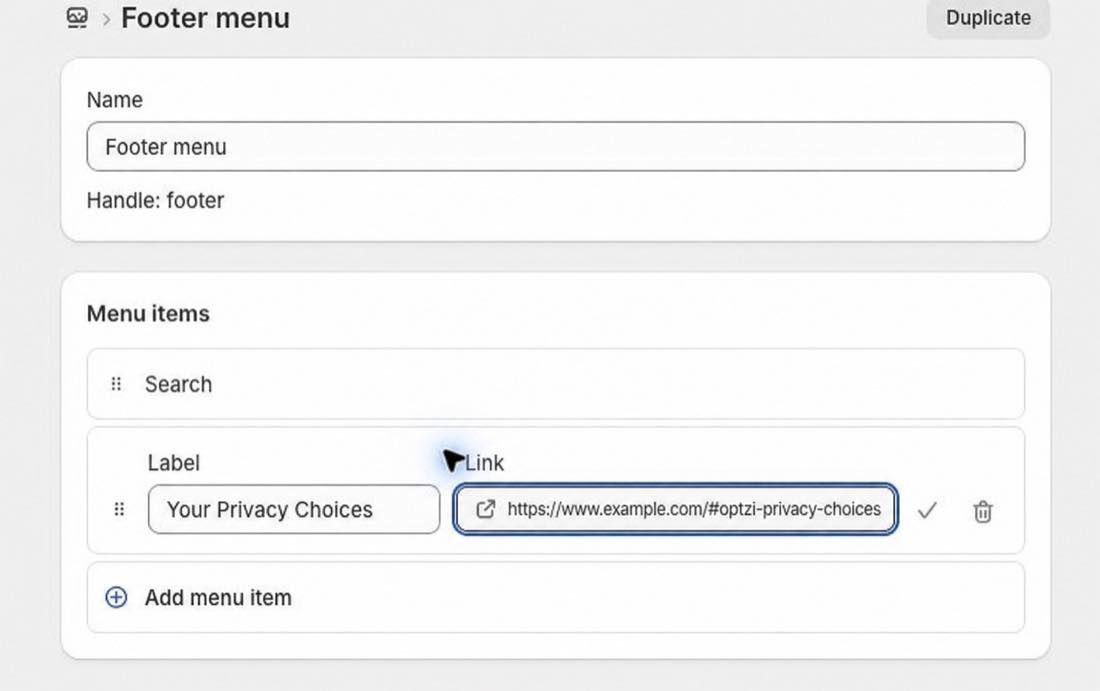
This must be a normal link. Do not add inline JavaScript or a link that calls window.__optzi__.
Update an existing installation
- In the optzi! dashboard, open your site and find Install on your site.
- Copy the latest complete installation code.
- Open Online Store → Themes, then use the live theme's … → Edit code action.
- Open layout/theme.liquid.
- Replace the entire old optzi! installation with the new code. Do not edit or combine individual pieces.
- Search the current theme for other optzi! installations and remove duplicates. Do not change unrelated scripts.
- Select Save and retest the storefront.
Older optzi! code could be affected by theme styles that hide empty elements. The current code protects itself from common rules such as div:empty { display: none }. Replace the complete code if the banner or launcher is missing; do not edit the theme's style rules.
Theme updates, theme replacement, or publishing a different theme can leave optzi! in an inactive theme. After any theme change, confirm the current published theme still contains one current installation.
How to test your installation
- Test the public storefront, not only the theme editor.
- Open the storefront in a new private or incognito window.
- Confirm the optzi! banner appears for a new visitor.
- Test the homepage, at least one product page, and the cart page.
- On a product page, confirm Add to cart, Buy it now, and any other purchase buttons are visible, enabled, and functional.
- Confirm cart controls and checkout links remain visible and functional.
- Use the banner to save a choice, then reload or visit another page.
- Confirm the small returning-visitor launcher appears and reopens the preferences panel.
- Select the visible Privacy Choices footer link. Confirm the panel opens and that opening it alone does not change the saved choice.
- Test essential contact, search, login, and purchase controls used by your store.
A previous optzi! issue could prevent some Shopify Buy Buttons from appearing. It is fixed in the current release, but the purchase-control checks above are required after every installation or update.
Troubleshooting
The banner appears twice
Search the current theme for useoptzi or optzi. Keep exactly one current main installation in layout/theme.liquid. Check theme-app embeds and tag tools for a second optzi! installation, but do not remove unrelated scripts.
The banner does not appear
- Confirm the optzi! configuration is published.
- Confirm you edited the live theme shown above Draft themes, not an inactive copy.
- Confirm the complete code is directly after the opening
<head>inlayout/theme.liquidand select Save. - Test the public storefront in a new private window.
- If a theme or storefront cache still shows the older page, hard refresh and try again after a few minutes.
The Privacy Choices link is missing
In Online Store → Themes → Customize → Footer, confirm the footer is using the same menu you edited under Content → Menus.
The Privacy Choices link does nothing
Confirm its destination is the complete public storefront homepage URL ending in /#optzi-privacy-choices, and confirm the live theme contains the current optzi! installation. A fragment-only value is not accepted by the current Shopify menu editor.
Add to cart or Buy controls are missing or disabled
First replace the entire optzi! installation with the latest complete code from the dashboard and retest in a new private window. Do not remove or rewrite unrelated Shopify, theme, or app scripts. If the problem remains, contact optzi! support with the affected public product-page address.
An old version still appears
Confirm the current published theme—not only a draft theme—contains the latest complete code. Hard refresh, use a new private window, and allow a few minutes for cached storefront pages to update.
When to contact optzi! support
Contact optzi! support if one current installation is saved in the published theme but the banner, launcher, Privacy Choices panel, or purchase controls do not work. Include:
- your public storefront address;
- affected product or cart page addresses;
- the current theme's name;
- what you expected and what happened; and
- screenshots with private information hidden.
Never send passwords, secret keys, customer information, or private account information.