Install optzi! on a Showit Website
Add optzi! to Showit’s global head code, cover Showit and WordPress-delivered pages, add a Privacy Choices footer link, and test the published site.
Last updated About 1 month ago
Overview
Add the main optzi! installation code as global head code for your Showit pages. Then add a separate, visible Privacy Choices link to the footer.
Showit sites with a blog can also have pages delivered by WordPress. Showit pages and WordPress-delivered pages may need separate installation checks, even when they use the same domain.
Opening Privacy Choices does not accept, reject, or change consent. A visitor's choices change only when they save a choice in the optzi! panel.
Before you begin
- Publish your optzi! configuration. In the optzi! dashboard, make sure the site shows Published, not Not published or changes waiting to be published.
- In the optzi! dashboard, open your site and find Install on your site. Copy the complete installation code shown there.
- In Showit, confirm that the pages you want to cover use a Site Canvas Set. Showit's Global Custom Code is applied through selected Site Canvas Sets.
- Find out whether your site has a WordPress blog. A WordPress admin address often ends in
/wp-admin. - Keep the main installation code and the visible footer link as two separate items.
Add the main optzi! installation code to Showit pages
- In the Showit Design App, select the SITE tab.
- Select Site Settings.
- Open the Integrations tab.
- Select + Add Custom Code.
- Name the entry optzi!.
- Under Head HTML (inside <head>), select Click To Edit.
- Paste the complete code from Install on your site in the optzi! dashboard and confirm the edit.
- Select every Site Canvas Set used by the Showit pages that need optzi!.
- Close Site Settings.
- Publish the Showit design.
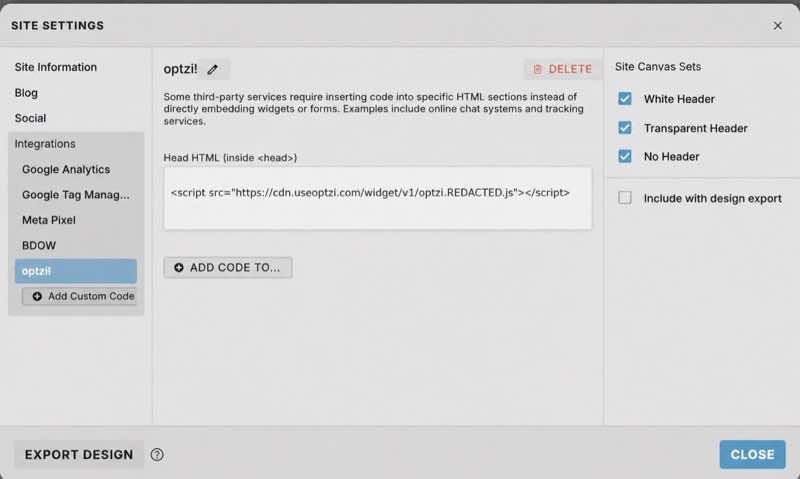
Do not use Add code to... for the main installation. In the current Showit interface, that control adds other code positions; the head has its own Head HTML (inside <head>) field.
If your design has no Site Canvas Sets, Showit's Global Custom Code will not apply. Contact Showit support or your site designer for help creating the right shared set before publishing.
Check WordPress-delivered pages
Your homepage and normal pages listed under Showit's Site Pages are usually delivered by Showit. Blog posts and pages created under Posts or Pages in WordPress are delivered by WordPress using Showit-designed templates. A page can look like the rest of your site but still be delivered by WordPress.
- Make a list of representative pages: homepage, another Showit page, blog, and privacy-policy page.
- Publish the Showit design, then test those public addresses.
- If optzi! appears on Showit pages but not on WordPress-delivered pages, use the WordPress site's existing header-code tool to add the same complete installation to the WordPress page head.
- If the WordPress site has no existing header-code tool, contact your site manager, Showit support, or optzi! support before adding one. Avoid editing theme files directly unless you manage the theme and its updates.
- Confirm each representative page loads exactly one current optzi! installation.
Do not add the code a second time where Showit global code already appears on WordPress-delivered pages. Publishing Showit changes does not necessarily update code injected by WordPress.
Add the Privacy Choices footer link
- In Showit, open the footer or shared footer Site Canvas.
- Add or select the visible text Privacy Choices (or the wording your legal adviser has approved).
- With the text selected, open Click Actions.
- Choose URL and enter exactly:
#optzi-privacy-choices - Keep the link in the current window.
- Make sure the footer canvas is included on the Showit pages and blog templates where the link should appear.
- Publish the Showit design.
- If a WordPress-delivered page uses a separate WordPress footer, add the same normal link in that footer's editor too.
Do not add inline JavaScript or a link that calls window.__optzi__.
Update an existing installation
Some older optzi! installation codes continue working but do not update automatically.
- In the optzi! dashboard, open your site and find Install on your site.
- Copy the latest complete installation code.
- In SITE → Site Settings → Integrations, open the optzi! Global Custom Code entry.
- Replace the entire old installation with the new code. Do not edit or combine individual pieces.
- Review selected Site Canvas Sets, save, and publish the Showit design.
- If WordPress separately injects optzi!, replace the entire old code in its header-code tool too.
- Check representative pages and remove duplicates until each page has exactly one current installation. Do not remove unrelated Showit or WordPress code.
How to test your installation
Test public pages, not only the Showit Design App or preview.
- Open the published site in a new private or incognito window.
- Test at least the homepage, another Showit page, the blog, and the privacy-policy page.
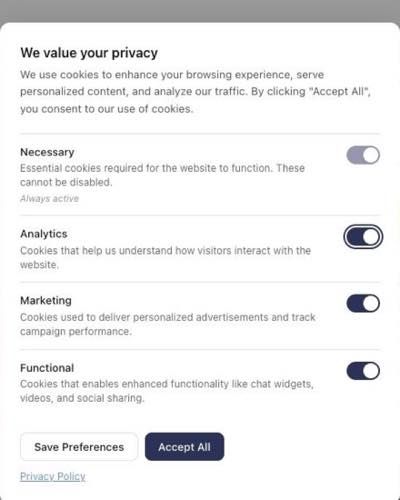
- Confirm the optzi! banner appears for a new visitor on each representative page.
- Confirm each page has exactly one banner and one returning-visitor launcher.
- Use the banner to save a choice, then reload or visit another page.
- Confirm the small returning-visitor launcher appears and reopens the preferences panel.
- Select the visible Privacy Choices footer link. Confirm the panel opens and that opening it alone does not change the saved choice.
- Test essential purchase, booking, contact, comment, and form-submit controls used on those pages.
Troubleshooting
The banner appears twice
The same page may receive optzi! from both Showit Global Custom Code and a WordPress header-code tool. Keep exactly one current installation on that page. Check representative pages before removing anything, and do not remove unrelated code.
The banner appears on the homepage but not the blog or privacy policy
The missing page may be delivered by WordPress. Check whether its content is edited under WordPress Posts or Pages. Add the complete current code through the WordPress site's existing header-code tool only if Showit global code is not already present there.
The banner does not appear on Showit pages
- Confirm the optzi! configuration is published.
- Confirm the Global Custom Code entry is saved in Head HTML (inside <head>).
- Confirm the relevant Site Canvas Sets are selected.
- Publish the Showit design and test the public domain in a new private window.
- Hard refresh or wait a few minutes if an older cached page remains.
The Privacy Choices link does nothing
Confirm its URL is exactly #optzi-privacy-choices, it opens in the current window, and one current optzi! installation runs on that page. Check the Showit footer and any separate WordPress footer.
Updating Showit did not update a WordPress page
Publishing Showit can update the design used by WordPress, but it does not necessarily update code added through a WordPress header-code tool. Check and update that separate installation.
An old version still appears
Replace the complete old installation everywhere it is separately injected, then publish or save each system. Clear any WordPress caching tool, hard refresh, and test in a new private window. Do not edit individual pieces of the code.
When to contact optzi! support
Contact optzi! support if representative public pages still have a missing or duplicate installation after you check both Showit and WordPress. Include:
- the public addresses of one working and one affected page;
- whether each page is edited in Showit or WordPress;
- where optzi! is currently installed;
- what you expected and what happened; and
- screenshots with private information hidden.
Never send passwords, secret keys, WordPress login details, or private account information.