Getting Started with optzi!
Follow the complete optzi! setup path, from adding your site through scanning, publishing, and testing.
Last updated About 2 months ago
Getting Started with optzi!
optzi! takes you from a new site to a live, on-brand consent banner in five guided milestones: Design, Behavior, Site scan, Install, and Publish.
This guide gives you the full path and shows what “done” looks like at each stage.

optzi! helps you configure and operate consent controls. Your legal obligations still depend on your business, visitors, technologies, and data practices. Review your setup with qualified counsel when appropriate.
Before you start
Have these ready:
Your public domain
Access to your website's global
<head>or site-wide code settingsYour privacy-policy URL
A list of important tools on the site, such as analytics, advertising, chat, video, scheduling, and tag management
A private or incognito browser window for final testing
Only an account owner can complete settings that change the live configuration. A member can still view the setup progress and installation help.
1. Add your site
Sign in to optzi! and add the website you want to manage. Use the real public domain for the site, not a one-time preview URL.
After the site is created, optzi! opens its setup guide. The site itself is already in place, so the guide begins with the five milestones that make the banner ready to launch.
2. Design the banner
Open Banner → Design.
Choose the colors, logo, font, position, wording, and post-consent state that fit your website. Preview the banner, preferences, and minimized views before you continue.
A good first version should:
Look consistent with the rest of your site
Keep the primary actions easy to read and use
Use plain language for the title, explanation, and buttons
Remain readable on both desktop and mobile layouts
Save your design. You can return and refine it later.
3. Choose visitor behavior
Open Banner → Behavior.
Choose how visitors outside the EU, UK, and EEA are handled. Visitors in the EU, UK, and EEA always begin with a strict opt-in experience.
Review these settings before you save:
Visitor behavior: choose the experience that matches your policy and legal guidance.
Automatic blocking: turn this on when you want optzi! to apply your script categories to the third-party scripts it can observe.
Privacy-policy link: add the public page that explains how you use visitor data.
Controller details: add the organization details your banner should show, if applicable.
Consent categories: confirm the names, descriptions, and default behavior visitors will see.
optzi! also recognizes a browser's Global Privacy Control signal. That signal applies on top of the visitor flow you choose.
Save the Behavior settings before continuing.
4. Scan and review your site
Open Scripts and run a site scan.
Static discovery fetches pages from your site and looks for third-party scripts and iframes in the HTML. It does not execute JavaScript, so a script loaded later by another script may appear only through runtime observation or may need an Advanced Rule.
Review each finding:
Open the finding and inspect its source, URL, and available context.
Decide whether the script belongs on your site.
Assign the category that matches what the script does: Functional, Analytics, or Marketing.
Approve the script, or ignore it if it is not something optzi! should manage.
Repeat until the review queue is clear enough for launch.
If you do not recognize a script, search the domain and confirm which site feature or vendor created it. Do not choose a category based only on the script's name.
See Scan, review, and publish script rules for the complete workflow.
5. Install optzi! on your website
Return to the site overview and find Install on your site.
Choose the outage behavior that fits your site.
Copy the complete snippet generated for this site.
Paste it into the global
<head>of your website.Place it before Google Tag Manager, analytics, advertising, or other optional third-party scripts.
Do not add
asyncordeferto the optzi! snippet.Save the website change and publish your website through its CMS or hosting workflow.
The generated snippet is site-specific. Preserve its URL, integrity value, site key, cross-origin setting, and outage behavior exactly.
Read Installing optzi! on your site before changing a live website.
6. Publish the optzi! configuration
Saving a design or rule does not always make that change live. Use Publish or Deploy changes when optzi! shows that changes are pending.
Review the confirmation, then publish. If optzi! warns that the site has no privacy-policy link, add the link before publishing unless you have a deliberate reason and appropriate guidance to continue without it.
After publication, the dashboard should report that your banner is live and up to date.
7. Verify the live result
Open the public website in a private or incognito window. A normal window may already have a stored consent choice and can hide the first-visit experience.
Verify all of the following:
The banner appears and matches the design you saved.
The browser requests the optzi! widget.
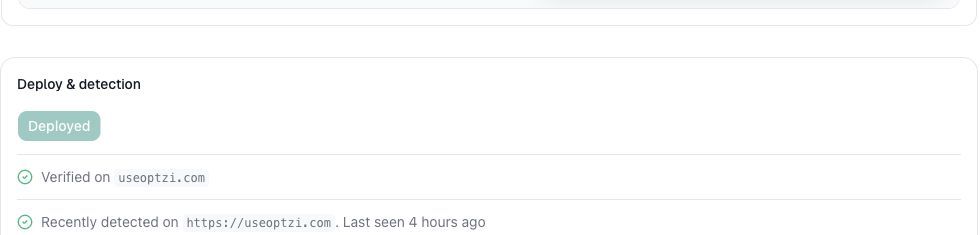
Deploy & detection reports a recent detection on the expected domain.
Rejecting optional categories keeps the matching scripts from running.
Granting a category allows its approved scripts to run.
Privacy choices can be reopened after the banner closes.
Your privacy-policy link opens the correct page.
The layout works on a narrow mobile viewport.
If optzi! says Not yet detected, confirm that the website change was published, clear any page or CDN cache, and test again in a private window. A script tag that exists in the HTML but never makes a network request is not a working installation.
What Ready Looks Like
The banner preview shows how your consent experience looks. Deploy & detection shows that the live installation was actually detected.
Your site is ready for the final launch check when all of these are true:
☐ Site uses the correct public domain
☐ Design is saved and reviewed on desktop and mobile
☐ Behavior and consent categories are saved
☐ Privacy-policy link is set
☐ Site scan completed
☐ Important findings are reviewed and categorized
☐ optzi! snippet is first among consent-sensitive scripts in
<head>☐ Website change is published
☐ optzi! changes and rules are published
☐ Dashboard shows recent detection
☐ Denied, granted, and reopened-choice paths are tested
Keep the setup healthy
Run a new scan after adding or replacing website tools. Review new runtime findings, publish rule changes, and periodically test the consent experience in a private window.
If you contact support, include the affected domain, what you expected, what happened, and the approximate time of the test. Do not include passwords, payment-card information, private keys, session tokens, or JWTs.